-
빛 전파 볼륨 (Light Propagation Volume)개인 프로젝트 2024. 1. 13. 20:57

( LPV Off / LPV On ) 목차
- 개요
- 구현 방식
- RSMs DownSampling
- Light Injection
- Geometry Injection
- Propagation
- Rendering
- 마치며
- Reference
개요
Light Propagation Volume(이하 LPV)은 실시간으로 전역 조명(Global Illumination, 이하 GI)을 근사하는 기법의 하나입니다. 전에 소개했던 Reflective Shadow Maps(이하 RSMs)를 이용하기 때문에 RSMs에 대한 전반적인 이해가 필요합니다. 또한 광원을 구면 조화 함수(Spherical Harmonics, 이하 SH)를 통해 근사하기 때문에 SH에 대해서도 알고 있어야 합니다. 기억을 되살리실 수 있도록 이전 글의 링크를 아래에 첨부합니다.
구현 방식
LPV는 다음과 같은 순서로 구현됩니다.
- RSMs 텍스쳐를 준비합니다.
- RSMs의 각 텍스쳐를 적절한 크기로 다운 샘플링합니다.
- RSMs 텍스쳐를 이용하여 LPV의 볼륨 텍스쳐에 Virtual Point Light(이하 VPL)를 주입(Injection)합니다.
- RSMs 텍스쳐를 이용하여 기하 볼륨(Geometry Volume, 이하 GV) 텍스쳐에 잠재적 차단 여부(Blocking potential)를 주입(Injection)합니다.
- 3과 4의 볼륨 텍스쳐를 이용하여 최종 볼륨 텍스쳐에 조명을 전파합니다. 이 과정은 여러 번 반복될 수 있습니다.
- 5의 결과로 얻은 볼륨 텍스쳐를 이용하여 간접 조명을 렌더링합니다.
위의 과정을 그림으로 나타내면 다음과 같습니다.

출처 : https://unityshader.hatenablog.com/entry/2014/05/10/040142
번호 순서대로 1. RSMs 텍스쳐 렌더링, 2. 조명 주입, 3. 조명 전파, 4. 최종 렌더링 과정을 나타내고 있습니다.
이제 각 단계의 세부 구현을 천천히 살펴보도록 하겠습니다.
RSMs DownSampling
RSMs 텍스쳐 렌더링 과정은 이미 다뤘기 때문에 건너 뛰도록 하겠습니다. 생소하신 분은 다시 한번 개요란에서 소개한 Reflective Shadow Maps 링크의 글을 참고 바랍니다.
RSMs 텍스쳐 렌더링 결과로 다음과 같은 3가지의 텍스쳐를 얻을 수 있었습니다.
- 월드 공간 위치
- 월드 공간 법선 벡터
- 반사된 방사속
다운 샘플링 단계에서는 3가지 RSMs 텍스쳐를 원하는 해상도까지 다운 샘플링합니다. 텍스쳐의 해상도를 줄임에 따라서 조명 주입과 기하 주입 단계에서 성능이 개선되고 최종 렌더링 과정에서 발생할 수 있는 번쩍임 현상(flickering)을 줄이는데 도움이 된다고 합니다.
샘플 프로그램에서 RSMs는 각각 2048 x 2048 해상도에 캐스케이드 처리를 위한 2장의 텍스쳐로 이뤄져 있습니다. 이를 512 x 512 해상도까지 줄입니다. 다운 샘플링 코드는 Crytek의 LPV 문서 Appendix B에 수록되어 있는 다운 샘플링 필터 코드를 샘플 프로그램에 맞춰 수정한 뒤 사용하였습니다.
#include "Common/NormalCompression.fxh"
#include "IndirectLighting/LPV/LPVCommon.fxh"

cbuffer DownSampleRSMsParameters : register( b0 )
{
    uint3 RSMsDimensions;
    uint KernelSize;
    float3 ToLightDir;
};

Texture2DArray RSMsWorldPosition : register( t0 );
Texture2DArray RSMsNormal : register( t1 );
Texture2DArray RSMsFlux : register( t2 );

RWTexture2DArray<float4> OutRSMsWorldPosition : register( u0 );
RWTexture2DArray<float4> OutRSMsNormal : register( u1 );
RWTexture2DArray<float4> OutRSMsFlux : register( u2 );

/*
sRGB 색공간의 색에 대한 휘도를 계산하는 함수
*/
float Luminance( float3 color )
{
    return 0.2126f * color.r + 0.7152 * color.g + 0.0722f * color.b;
}

/*
텍셀의 휘도를 계산하는 함수
빛 방향에 따른 감쇄를 적용
*/
float TexelLuminance( float3 flux, float3 normal )
{
    return Luminance( flux ) * saturate( dot( ToLightDir, normal ) );
}

[numthreads(8, 8, 1)]
void main( uint3 DTid : SV_DispatchThreadID )
{
    if ( all( DTid < RSMsDimensions ) )
    {
        float maxLuminance = -1.f;
        uint4 brightestTexelUV;

        // 가장 밝은 텍셀을 선택
        for ( int y = 0; y < KernelSize; ++y )
        {
            for ( int x = 0; x < KernelSize; ++x )
            {
                uint4 uv = { DTid.x * KernelSize + x, DTid.y * KernelSize + y, DTid.z, 0 };

                float3 packedNormal = RSMsNormal.Load( uv ).yzw;
                float3 sampleNormal = SignedOctDecode( packedNormal );

                float3 sampleflux = RSMsFlux.Load( uv ).rgb;

                float sampleLuminance = TexelLuminance( sampleflux, sampleNormal );
                if ( maxLuminance < sampleLuminance )
                {
                    maxLuminance = sampleLuminance;
                    brightestTexelUV = uv;
                }
            }
        }

        float3 brightestPosition = RSMsWorldPosition.Load( brightestTexelUV ).xyz;
        // 가장 밝은 텍셀의 LPV 셀 위치 계산
        int3 brightestGridPos = GetGridPos( brightestPosition );

        float numSample = 0.f;
        float3 position = 0.f;
        float3 normal = 0.f;
        float3 flux = 0.f;

        for ( int y = 0; y < KernelSize; ++y )
        {
            for ( int x = 0; x < KernelSize; ++x )
            {
                uint4 uv = { DTid.x * KernelSize + x, DTid.y * KernelSize + y, DTid.z, 0 };

                float3 samplePosition = RSMsWorldPosition.Load( uv ).xyz;
                int3 sampleGridPos = GetGridPos( samplePosition );
                int3 dGrid = sampleGridPos - brightestGridPos;

                /*
                현재 텍셀의 LPV 셀 위치가 가장 밝은 텍셀의
                LPV 셀 위치 근처일 경우에만 추가
                두 셀 위치의 차를 내적한 값이 3보다 작은 경우만 포함할 경우
                가장 밝은 텍셀의 LPV 셀을 둘러쌓은 26개의 셀만 포함됨
                */
                if ( dot( dGrid, dGrid ) < 3 )
                {
                    float3 packedNormal = RSMsNormal.Load( uv ).yzw;
                    float3 sampleNormal = SignedOctDecode( packedNormal );

                    float3 sampleFlux = RSMsFlux.Load( uv ).rgb;

                    position += samplePosition;
                    normal += sampleNormal;
                    flux += sampleFlux;

                    ++numSample;
                }
            }
        }

        float numerator = 1.f / numSample;
        OutRSMsNormal[DTid] = float4( 0.f, SignedOctEncode( normal * numerator ) );
        OutRSMsWorldPosition[DTid] = float4( position * numerator, 0.f );
        OutRSMsFlux[DTid] = float4( flux * numerator, 0.f );
    }
}
LPV 셀 위치를 구하는 함수 GetGridPos는 다음과 같이 구현하였습니다.
cbuffer LPVCommonParameters : register( b5 )
{
    float4 TexDimension; // LPV 볼륨 텍스쳐 해상도
    float4 CellSize; // LPV 셀 하나의 월드 공간 기준 크기
};

/*
LPV 볼륨 텍스쳐의 셀 위치를 구하는 함수
월드 공간의 위치를 받아 셀의 인덱스를 나타내는 세정수 값을 반환
*/
int3 GetGridPos( float3 position )
{
    int3 halfTexDimension = int3( TexDimension.xyz * 0.5f );

    return ( position / CellSize.xyz ) + halfTexDimension;
}
Light Injection
조명 주입 단계에서는 RSMs의 VPL를 LPV 볼륨 텍스쳐에 기록합니다. LPV 볼륨 텍스쳐는 32 x 32 x 32 크기의 3D 텍스쳐로 다음과 같이 생성하였습니다.
LightPropagationVolume::LPVTextures LightPropagationVolume::AllocVolumeTextures( bool allocForOcclusion )
{
    LPVTextures volumeTextures;

    agl::TextureTrait trait = {
        .m_width = 32,
        .m_height = 32,
        .m_depth = 32,
        .m_sampleCount = 1,
        .m_sampleQuality = 0,
        .m_mipLevels = 1,
        .m_format = agl::ResourceFormat::R32G32B32A32_FLOAT,
        .m_access = agl::ResourceAccessFlag::Default,
        .m_bindType = agl::ResourceBindType::ShaderResource | agl::ResourceBindType::RenderTarget | agl::ResourceBindType::RandomAccess,
        .m_miscFlag = agl::ResourceMisc::Texture3D
    };

    volumeTextures.m_coeffR = RenderTargetPool::GetInstance().FindFreeRenderTarget( trait, "LPV.Coeff.R" );
    volumeTextures.m_coeffG = RenderTargetPool::GetInstance().FindFreeRenderTarget( trait, "LPV.Coeff.G" );
    volumeTextures.m_coeffB = RenderTargetPool::GetInstance().FindFreeRenderTarget( trait, "LPV.Coeff.B" );

    /*
    Geometry Injection 단계에서 사용될 텍스쳐 할당
    */
    if ( allocForOcclusion )
    {
        volumeTextures.m_coeffOcclusion = RenderTargetPool::GetInstance().FindFreeRenderTarget( trait, "LPV.Coeff.Occlusion" );
    }

    return volumeTextures;
}
LPV 볼륨 텍스쳐의 각 텍셀에 점광원을 저장합니다. 점광원은 방향에 따라 다른 세기와 색상을 가질 수 있기 때문에 전 방향에 대한 정보를 저장할 필요가 있는데 만약 텍셀마다 큐브 맵 형태로 저장하게 된다면 많은 메모리를 사용해야 합니다. 따라서 점광원을 SH로 근사하여 저장하도록 합니다.
L1 Band SH로 저장할 것이기 때문에 텍셀에 4개의 계수를 저장합니다. 따라서 텍스쳐 포맷은 R32G32B32A32_FLOAT를 사용합니다. 그리고 R, G, B 채널을 위해 총 3개의 텍스쳐를 할당합니다.
이제 준비된 LPV 볼륨 텍스쳐에 RSMs 텍스쳐의 VPL을 주입합니다. 동일한 LPV 볼륨 텍스쳐의 텍셀에 동시에 값을 기록하는 상황이 발생할 수 있기 때문에 데이터 레이스에 주의해야 합니다. GLSL의 경우 컴퓨트 셰이더에서 텍스쳐에 대한 아토믹 연산( imageAtomicAdd )을 제공하지만, HLSL에서는 제공하지 않기 때문에 컴퓨트 셰이더를 사용하지 않고 구현하였습니다. 따라서 다음과 같이 블렌드 스테이트를 설정하여 동일한 LPV 볼륨 텍스쳐 텍셀에 SH 계수가 누적될 수 있도록 해야 합니다.
/*
누적 블렌드 스테이트 설정
*/
BlendOption passBlendOption;
for ( int32 i = 0; i < 3; ++i )
{
    passBlendOption.m_renderTarget[i].m_blendEnable = true;
    passBlendOption.m_renderTarget[i].m_srcBlend = agl::Blend::One;
    passBlendOption.m_renderTarget[i].m_destBlend = agl::Blend::One;
    passBlendOption.m_renderTarget[i].m_blendOp = agl::BlendOp::Add;
    passBlendOption.m_renderTarget[i].m_srcBlendAlpha = agl::Blend::One;
    passBlendOption.m_renderTarget[i].m_destBlendAlpha = agl::Blend::One;
    passBlendOption.m_renderTarget[i].m_blendOpAlpha = agl::BlendOp::Add;
}
이제 조명 주입 셰이더들을 보겠습니다. 먼저 버텍스 셰이더 부터 살펴보겠습니다.
#include "Common/NormalCompression.fxh"
#include "Common/ViewConstant.fxh"
#include "IndirectLighting/LPV/LPVCommon.fxh"
#include "Shadow/ShadowCommon.fxh"

Texture2DArray RSMsWorldPosition : register( t0 );
Texture2DArray RSMsNormal : register( t1 );
Texture2DArray RSMsFlux : register( t2 );

cbuffer LightInjectionParameters : register( b0 )
{
    uint3 RSMsDimensions;
    float4 SurfelArea[MAX_CASCADED_NUM];
}

struct VS_OUTPUT
{
    float4 position : SV_POSITION;
    float3 normal : NORMAL;
    float3 flux : FLUX;
    int skip : SKIP;
    float surfelArea : SURFEL_AREA;
};

VS_OUTPUT main( uint vertexId : SV_VertexID )
{
    VS_OUTPUT output = (VS_OUTPUT)0;

    /*
    VertexID를 RSMs 텍스쳐 인덱스로 변경
    */
    uint zIndex = vertexId / ( RSMsDimensions.x * RSMsDimensions.y );
    uint sliceIndex = vertexId % ( RSMsDimensions.x * RSMsDimensions.y );
    uint xIndex = sliceIndex % RSMsDimensions.x;
    uint yIndex = sliceIndex / RSMsDimensions.x;

    uint4 uv = { xIndex, yIndex, zIndex, 0 };
    float3 worldPosition = RSMsWorldPosition.Load( uv ).xyz;

    float3 packedNormal = RSMsNormal.Load( uv ).yzw;
    float3 normal = SignedOctDecode( packedNormal );

    /*
    LPV 셀 위치 계산
    self illumination을 피하기 위해 normal 방향으로 살짝 이동시킨 위치에 주입
    */
    int3 gridPos = GetGridPos( worldPosition, normal );

    float2 screenPosition = { ( gridPos.x + 0.5f ) / TexDimension.x, ( gridPos.y + 0.5f ) / TexDimension.y };
    screenPosition = screenPosition * 2.f - 1.f;
    screenPosition.y = -screenPosition.y;

    output.position = float4( screenPosition, gridPos.z, 1.f );
    output.normal = normal;
    output.flux = RSMsFlux.Load( uv ).rgb;

    float3 viewPosition = mul( float4( worldPosition, 1.f ), ViewMatrix ).xyz;
    int cascadeIndex = SearchCascadeIndex( viewPosition.z );
    output.surfelArea = SurfelArea[cascadeIndex].x;
    /*
    캐스케이드 간 겹치는 부분이 중복으로 주입되는 것을 방지
    */
    output.skip = ( zIndex == cascadeIndex ) ? 0 : 1;

    return output;
}
다음은 지오메트리 셰이더입니다.
struct GS_INPUT
{
    float4 position : SV_POSITION;
    float3 normal : NORMAL;
    float3 flux : FLUX;
    int skip : SKIP;
    float surfelArea : SURFEL_AREA;
};

struct GS_OUTPUT
{
    float4 position : SV_POSITION;
    float3 normal : NORMAL;
    float3 flux : FLUX;
    float surfelArea : SURFEL_AREA;
    uint rtIndex : SV_RenderTargetArrayIndex;
};

[maxvertexcount(1)]
void main( point GS_INPUT input[1], inout PointStream<GS_OUTPUT> pointStream )
{
    /*
    캐스케이드 간 겹치는 부분이 중복으로 주입되는 것을 방지
    */
    if ( input[0].skip == 0 )
    {
        GS_OUTPUT output = (GS_OUTPUT)0;

        // output.
        output.position = float4( input[0].position.xy, 0.f, 1.f );
        output.normal = input[0].normal;
        output.flux = input[0].flux;
        output.surfelArea = input[0].surfelArea;
        /*
        SV_RenderTargetArrayIndex를 이용하여 3D 텍스쳐 렌더타겟에 렌더링
        해당 시멘틱은 GS에서만 대입가능
        */
        output.rtIndex = (uint)input[0].position.z;

        pointStream.Append( output );
    }
}
마지막으로 픽셀 셰이더입니다.
#include "Common/Constants.fxh"
#include "IndirectLighting/LPV/LPVCommon.fxh"

struct PS_INPUT
{
    float4 position : SV_POSITION;
    float3 normal : NORMAL;
    float3 flux : FLUX;
    float surfelArea : SURFEL_AREA;
    uint rtIndex : SV_RenderTargetArrayIndex;
};

struct PS_OUTPUT
{
    float4 coeffR : SV_Target0;
    float4 coeffG : SV_Target1;
    float4 coeffB : SV_Target2;
};

PS_OUTPUT main( PS_INPUT input )
{
    PS_OUTPUT output = (PS_OUTPUT)0;

    /*
    SH 근사
    */
    float4 coeff = CosineLobe( input.normal ) / PI * input.surfelArea;
    output.coeffR = coeff * input.flux.r;
    output.coeffG = coeff * input.flux.g;
    output.coeffB = coeff * input.flux.b;

    return output;
}
주목할 부분은 다음 코드라 할 수 있습니다.
float4 coeff = CosineLobe( input.normal ) / PI * input.surfelArea;이상적인 디퓨즈 표면에서 빛의 반사는 램버트 코사인 법칙을(Lambert’s cosine law)을 따른다고 할 수 있습니다. 이를 그림으로 나타내면 다음과 같습니다.
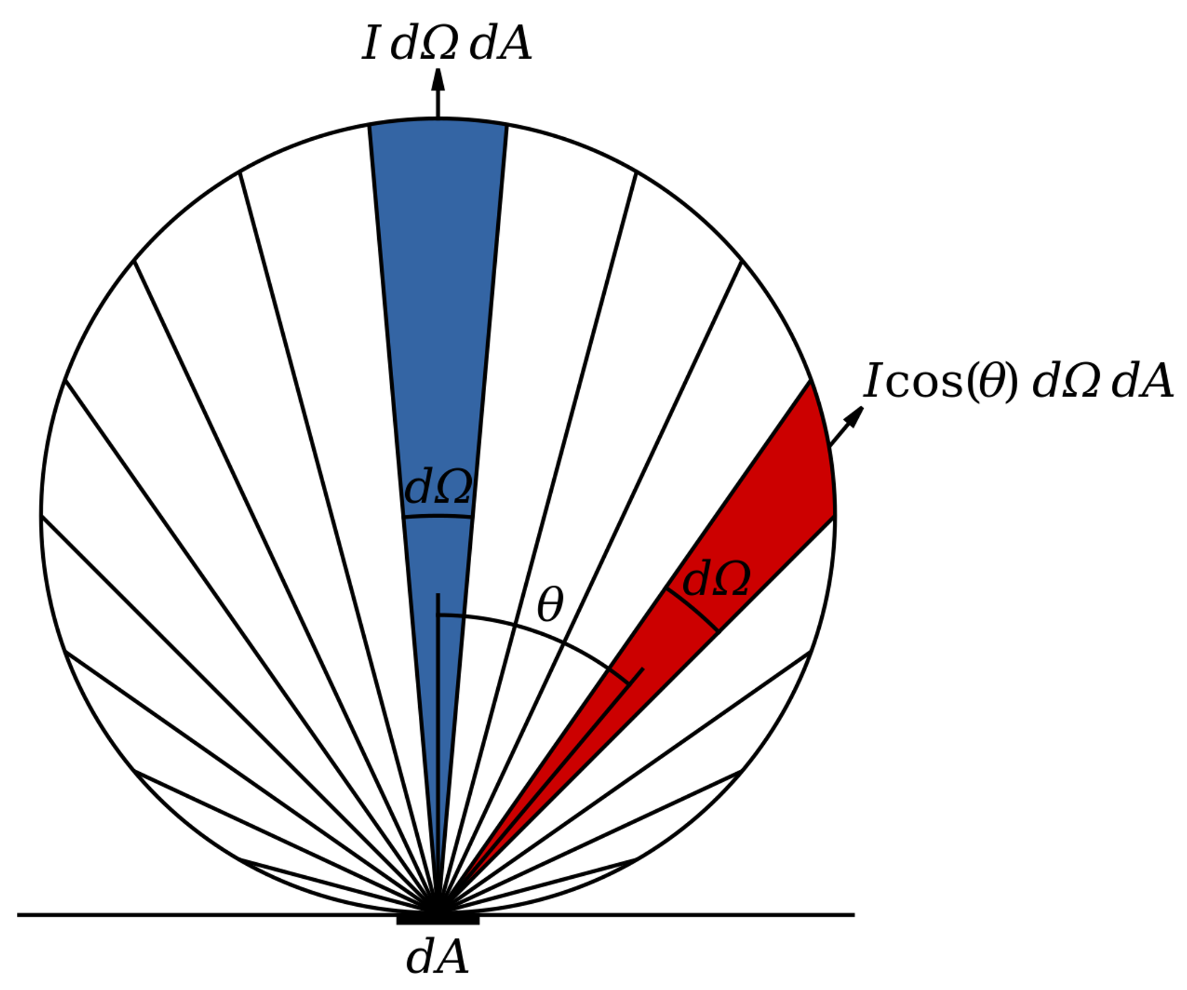
출처 : https://en.wikipedia.org/wiki/Lambert's_cosine_law
CosineLobe 함수는 램버트 코사인 법칙을 적용하기 위한 함수로 normal 방향을 기준으로 한 코사인 함수에 대한 SH 계수를 반환합니다.
float4 CosineLobe( float3 normal )
{
    static const float SHCosineLobeC0 = 0.886226925f; // sqrt( pi ) / 2
    static const float SHCosineLobeC1 = 1.02332671f; // sqrt( pi / 3 )

    return float4( SHCosineLobeC0, -SHCosineLobeC1 * normal.y, SHCosineLobeC1 * normal.z, -SHCosineLobeC1 * normal.x );
}
다음으로 PI로 나누는 이유는 에너지 보존을 위해서입니다.
SurfelArea는 조명 주입 시 사용되는 가중치입니다. RSMs 렌더링 방식에 따라 VPL의 밀도가 달라져 이를 조절하기 위해 사용됩니다.
RSMs 렌더링 시 넓은 범위를 텍스쳐에 그린다면 VPL사이의 월드 공간 거리는 점점 멀어집니다. 반대로 좁은 범위를 그린다면 VPL사이의 월드 공간 거리는 가까워지기 때문에 VPL의 밀도가 높아져 하나의 LPV 셀에 VPL 과다하게 주입 될 수 있습니다.
SurfelArea를 계산하는 식이 있으나 RSMs의 렌더링에 사용된 투영 행렬에 따라 달라지므로 샘플 프로그램에서는 어림잡은 고정값을 사용하였습니다.
Geometry Injection
기하 주입 단계는 전파 단계에서 조명이 벽과 같은 차폐물을 뚫고 전파되는 것을 막기 위한 잠재적 차단 여부를 GV에 기록합니다. 조명 주입 단계와 유사한 면이 많기 때문에 여기서는 다른 부분만 다루겠습니다.
우선 셀 위치 계산 시 조명 주입 단계에서 절반 어긋나도록 계산합니다.
int3 GetGridPosForGV( float3 position )
{
    int3 halfTexDimension = int3( TexDimension.xyz * 0.5f );

    return ( position / CellSize.xyz - 0.5f ) + halfTexDimension;
}
따라서 GV의 셀은 다음과 같이 LPV 셀의 사이에 위치하게 됩니다.
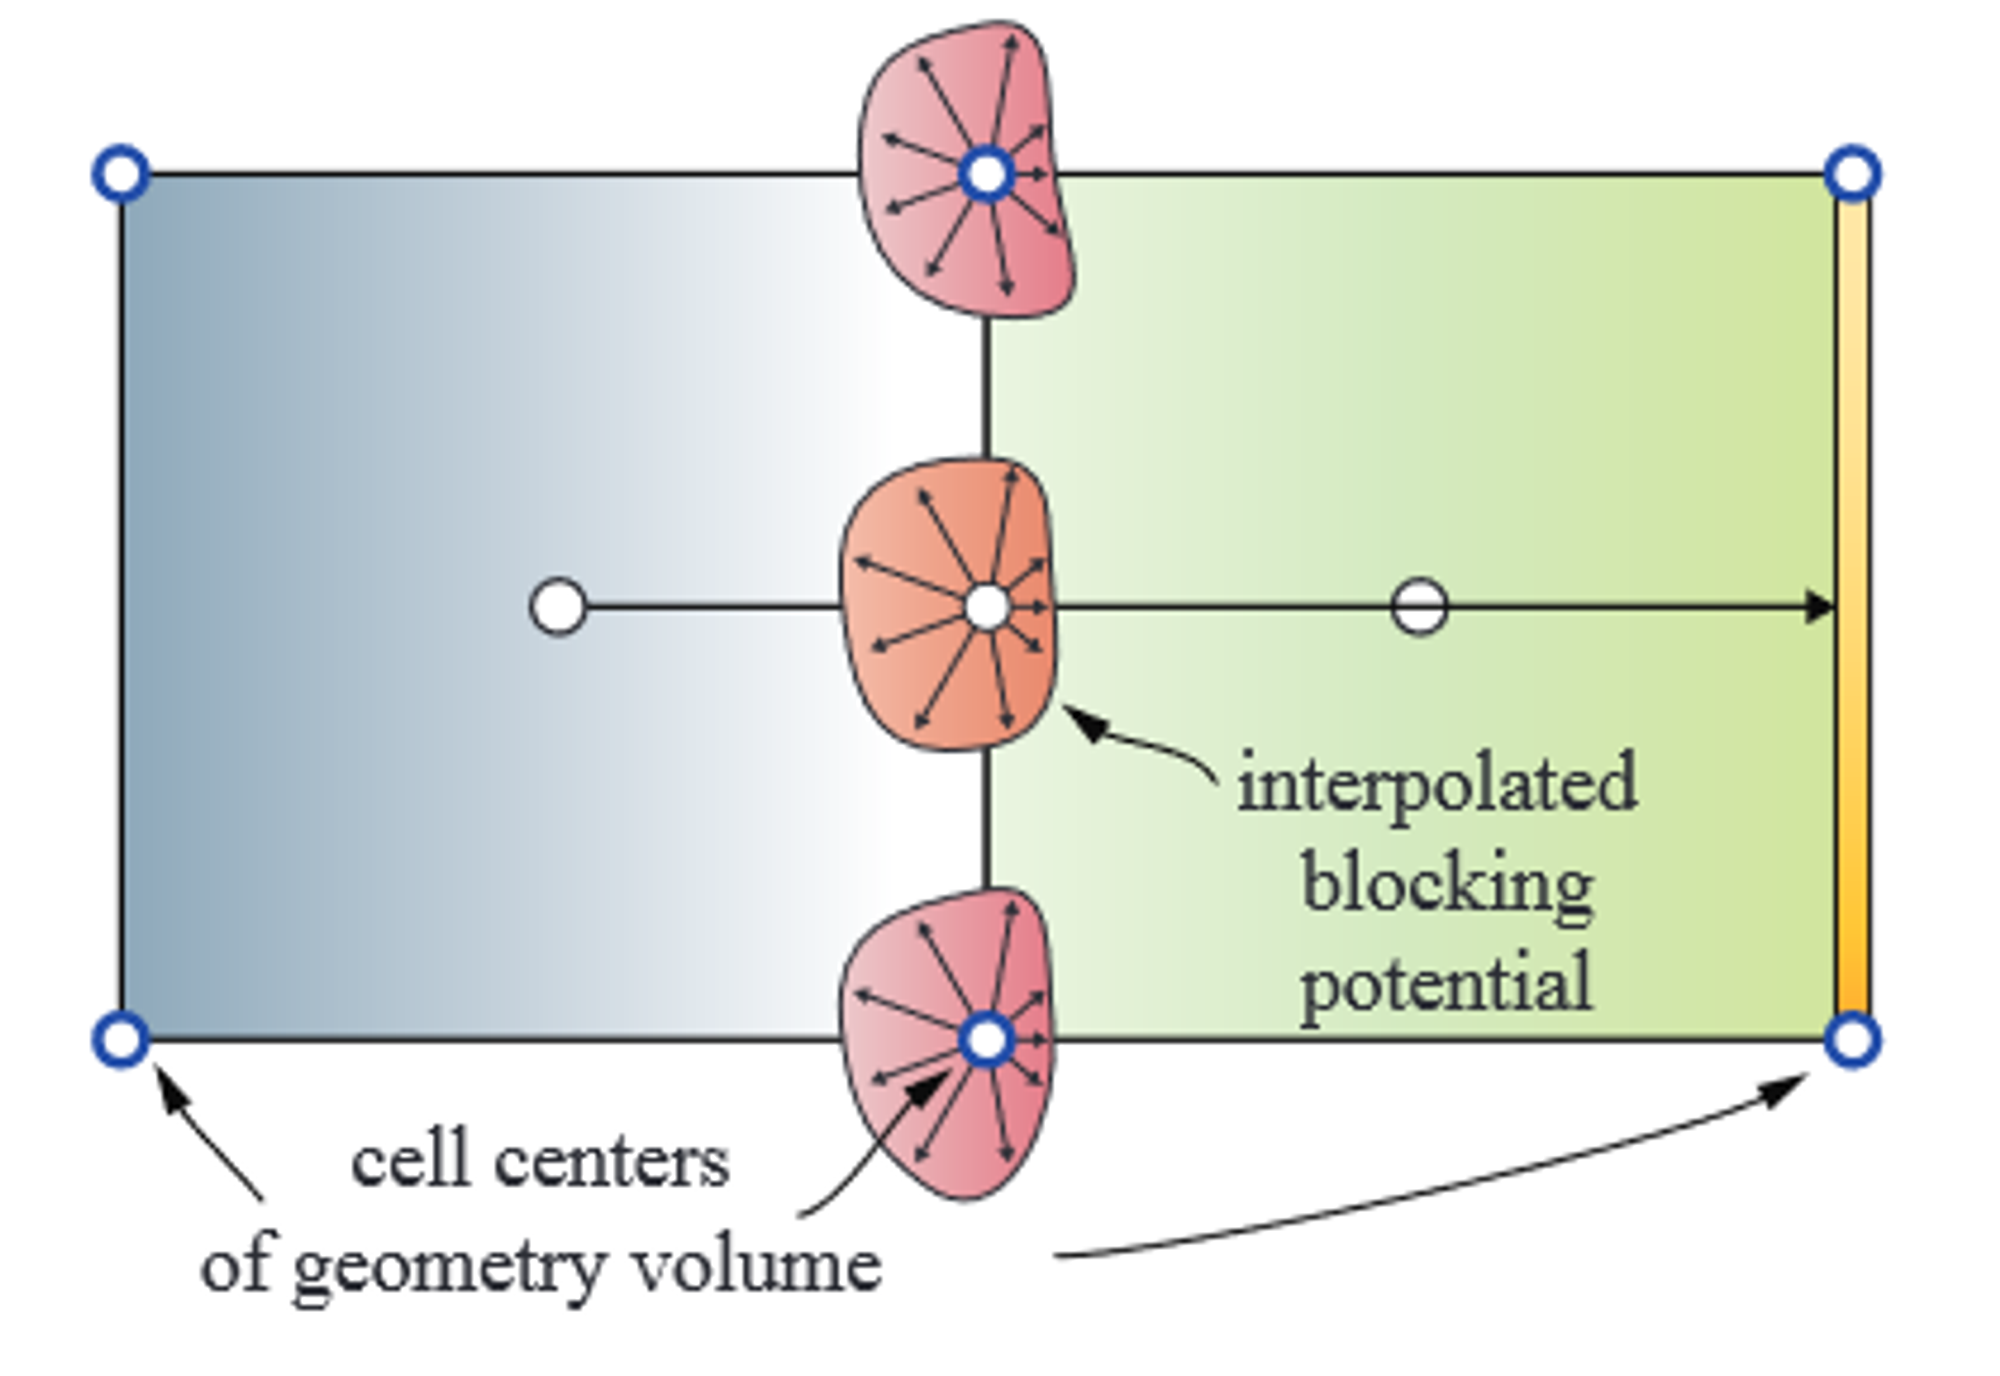
출처 : https://ia800902.us.archive.org/25/items/crytek_presentations/20100301_lpv.pdf
다음으로 잠재적 차단 여부는 RSMs의 월드 공간 법선 벡터와 조명 방향의 내적을 통해 계산합니다. 따라서 빛이 표면에 평행할수록 차단 가능성이 커집니다.
output.blockingPotencial = saturate( dot( -LightDirection, normal ) );이렇게 계산된 잠재적 차단 여부를 조명 주입과 마찬가지로 CosineLobe SH 계수를 통해 근사하여 GV에 저장합니다.
float4 coeff = CosineLobe( input.normal );
output.coeffOcclusion = coeff * input.blockingPotencial;
Propagation
전파 단계는 조명 주입 단계에서 LPV 볼륨에 주입된 빛을 확산시키는 단계입니다. 보통 확산이라고 하면 중심에서 주변으로 다음과 같이 퍼져가는 것을 생각합니다.

출처 : https://ia800902.us.archive.org/25/items/crytek_presentations/20100301_lpv.pdf
하지만 이런 방식은 여러 스레드가 동시에 셀에 접근하여 데이터 레이스가 발생할 수 있어 Gathering이라고 하는 방식을 사용합니다. Gathering 방식은 전파를 반대로 접근하여 주변 셀의 값을 읽어 중심 셀에 기록하는 것으로 데이터 레이스를 방지합니다.
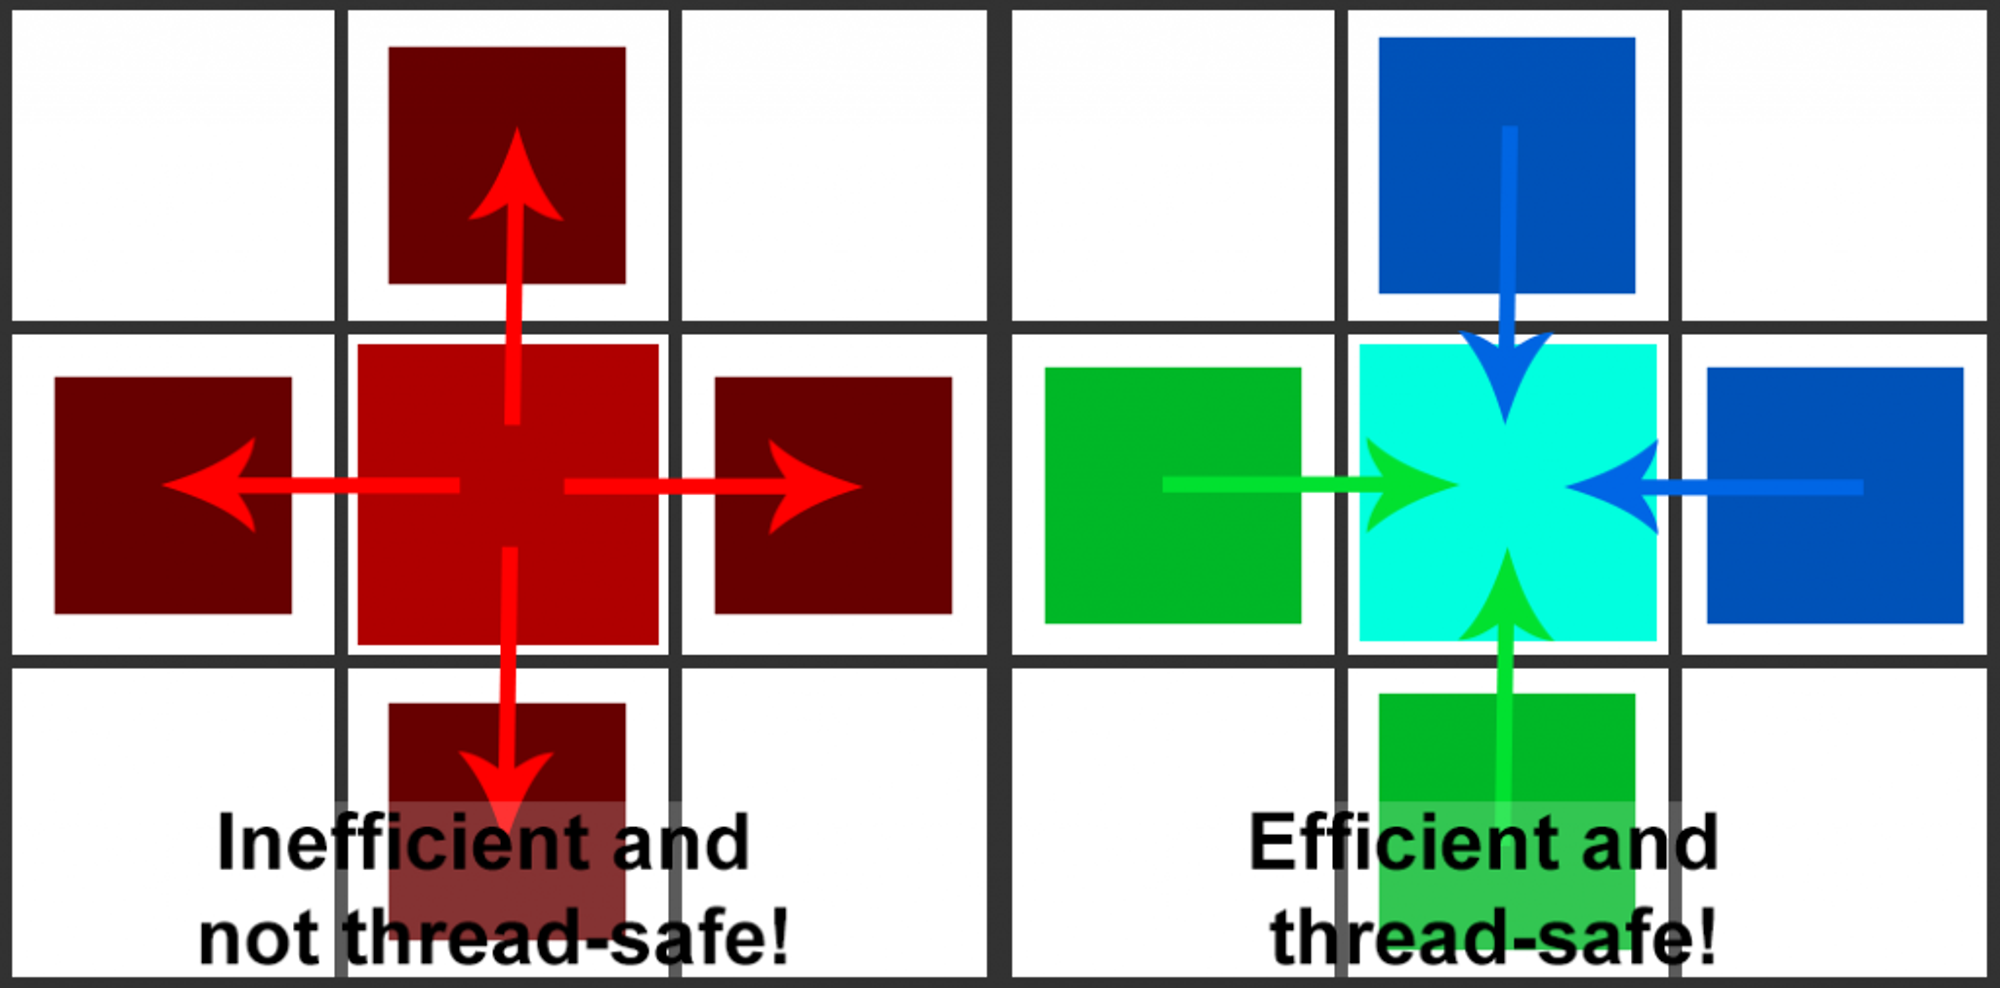
출처 : https://ericpolman.com/2016/06/28/light-propagation-volumes/
전파 단계가 실행될 때마다 빛은 한 셀씩 퍼져나가므로 전파 단계를 여러 번 실행할 수 있습니다.
전체 코드를 살펴보기 전 하나의 셀에 대한 전파 과정을 살펴보겠습니다.

출처 : https://ia800902.us.archive.org/25/items/crytek_presentations/20100301_lpv.pdf
위 그림은 빛이 전파되는 한 과정을 그린 그림입니다. 이와 같이 전파 시에는 우선 대상 셀의 면을 대상으로 하여 빛을 전파합니다. 대상이 되는 면은 출발 셀(source cell)과 맞닿지 않은 5면이 대상이 됩니다.
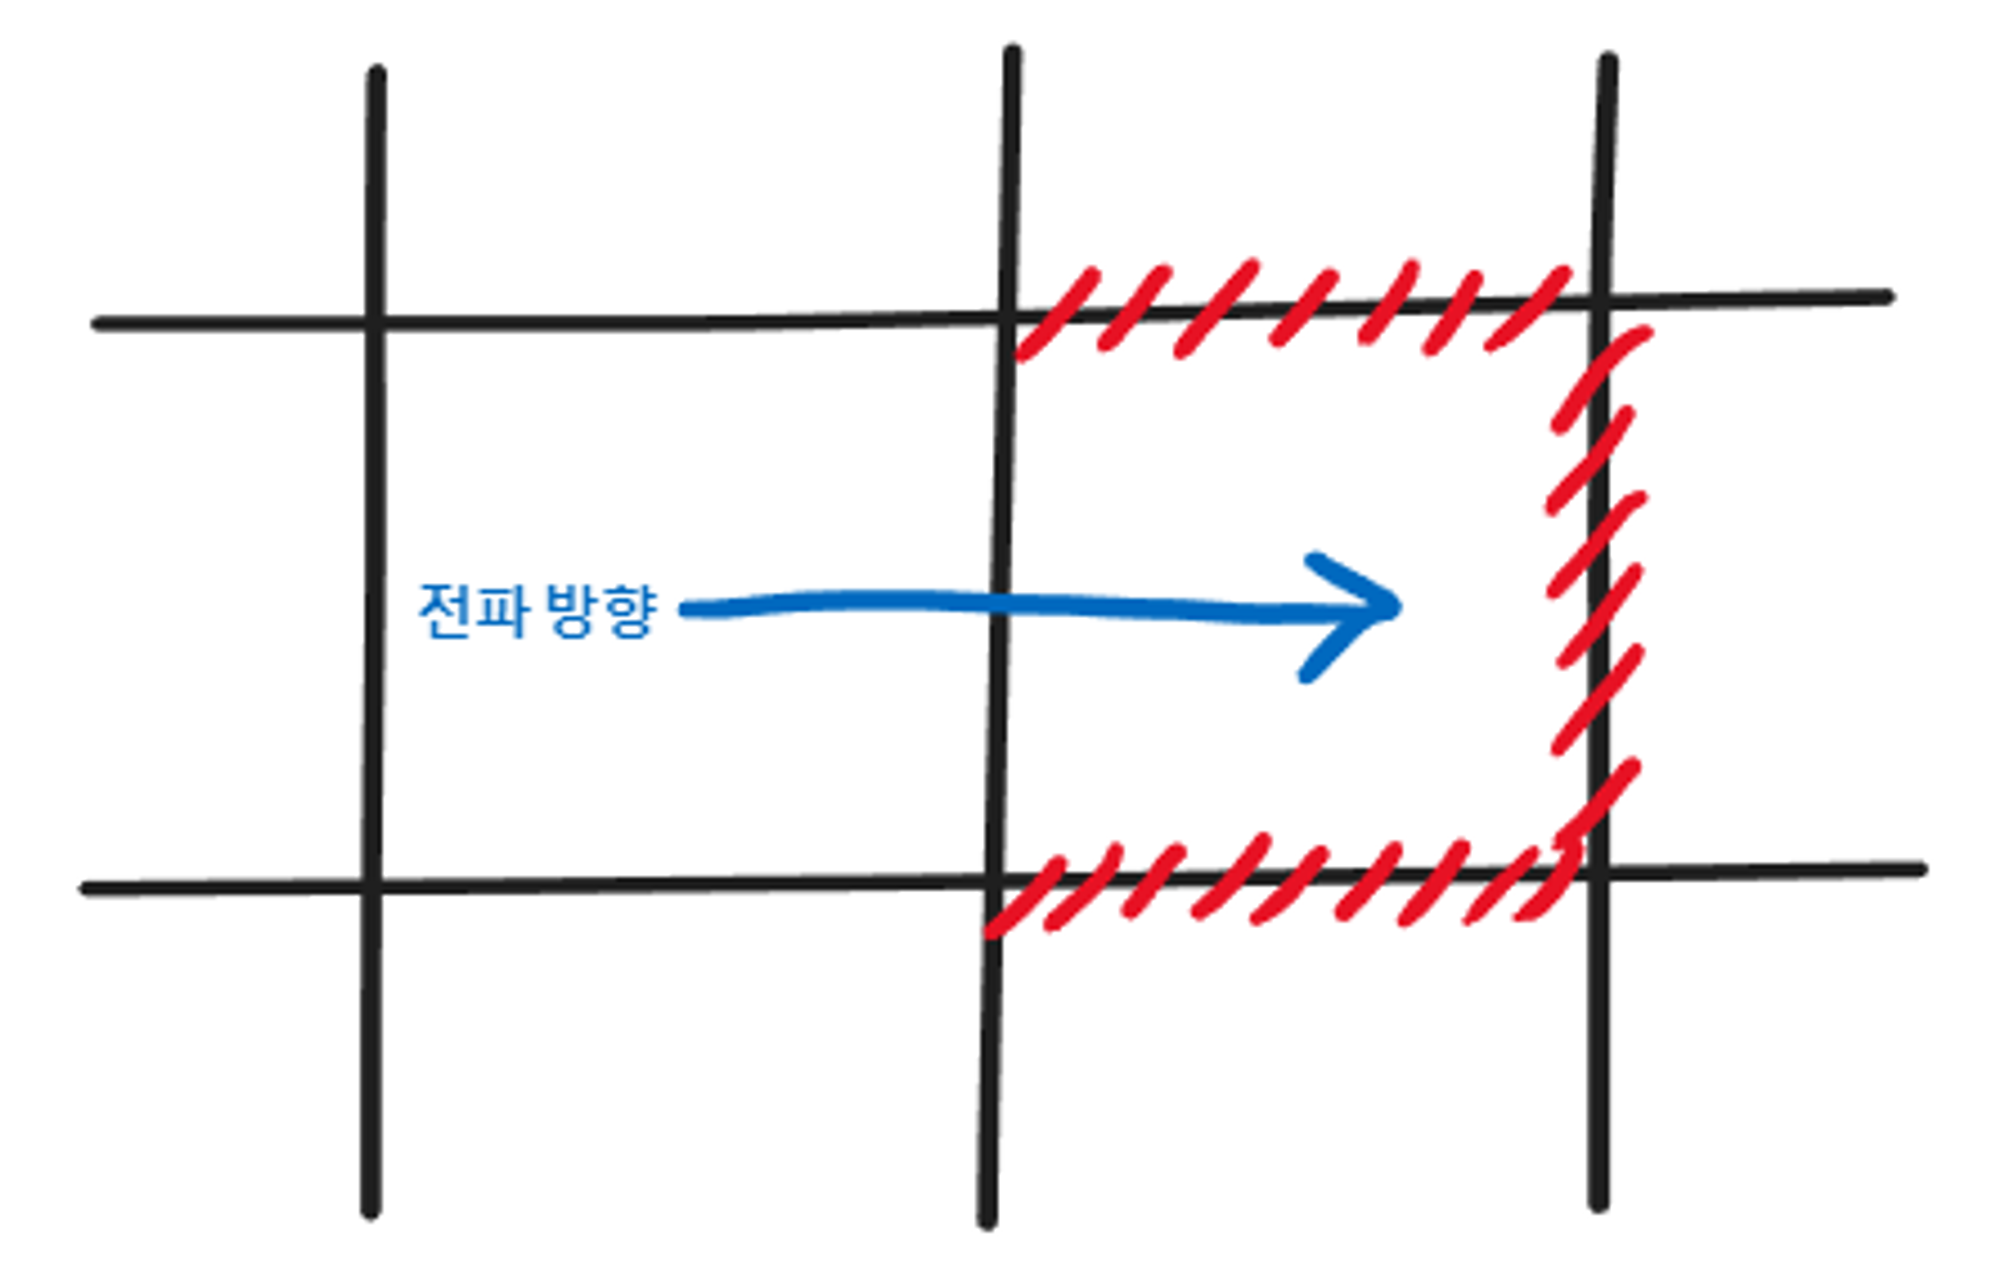
이렇게 면을 대상으로 하는 이유는 구형 조명을 정육면체 그리드를 통해 전파하여 빛이 닿지 않는 부분이 발생할 수 있기 때문입니다. 이는 다음과 같이 구와 정육면체 그리드간의 공백이 있기 때문입니다.

5면에 빛을 전파하기 위해서는 5면에 대한 방향 벡터와 입체각을 알 필요가 있습니다. 우선 방향 벡터부터 보도록 하겠습니다. 전파 방향의 면에 대해서는 전파 방향이 곧 방향 벡터가 됩니다.
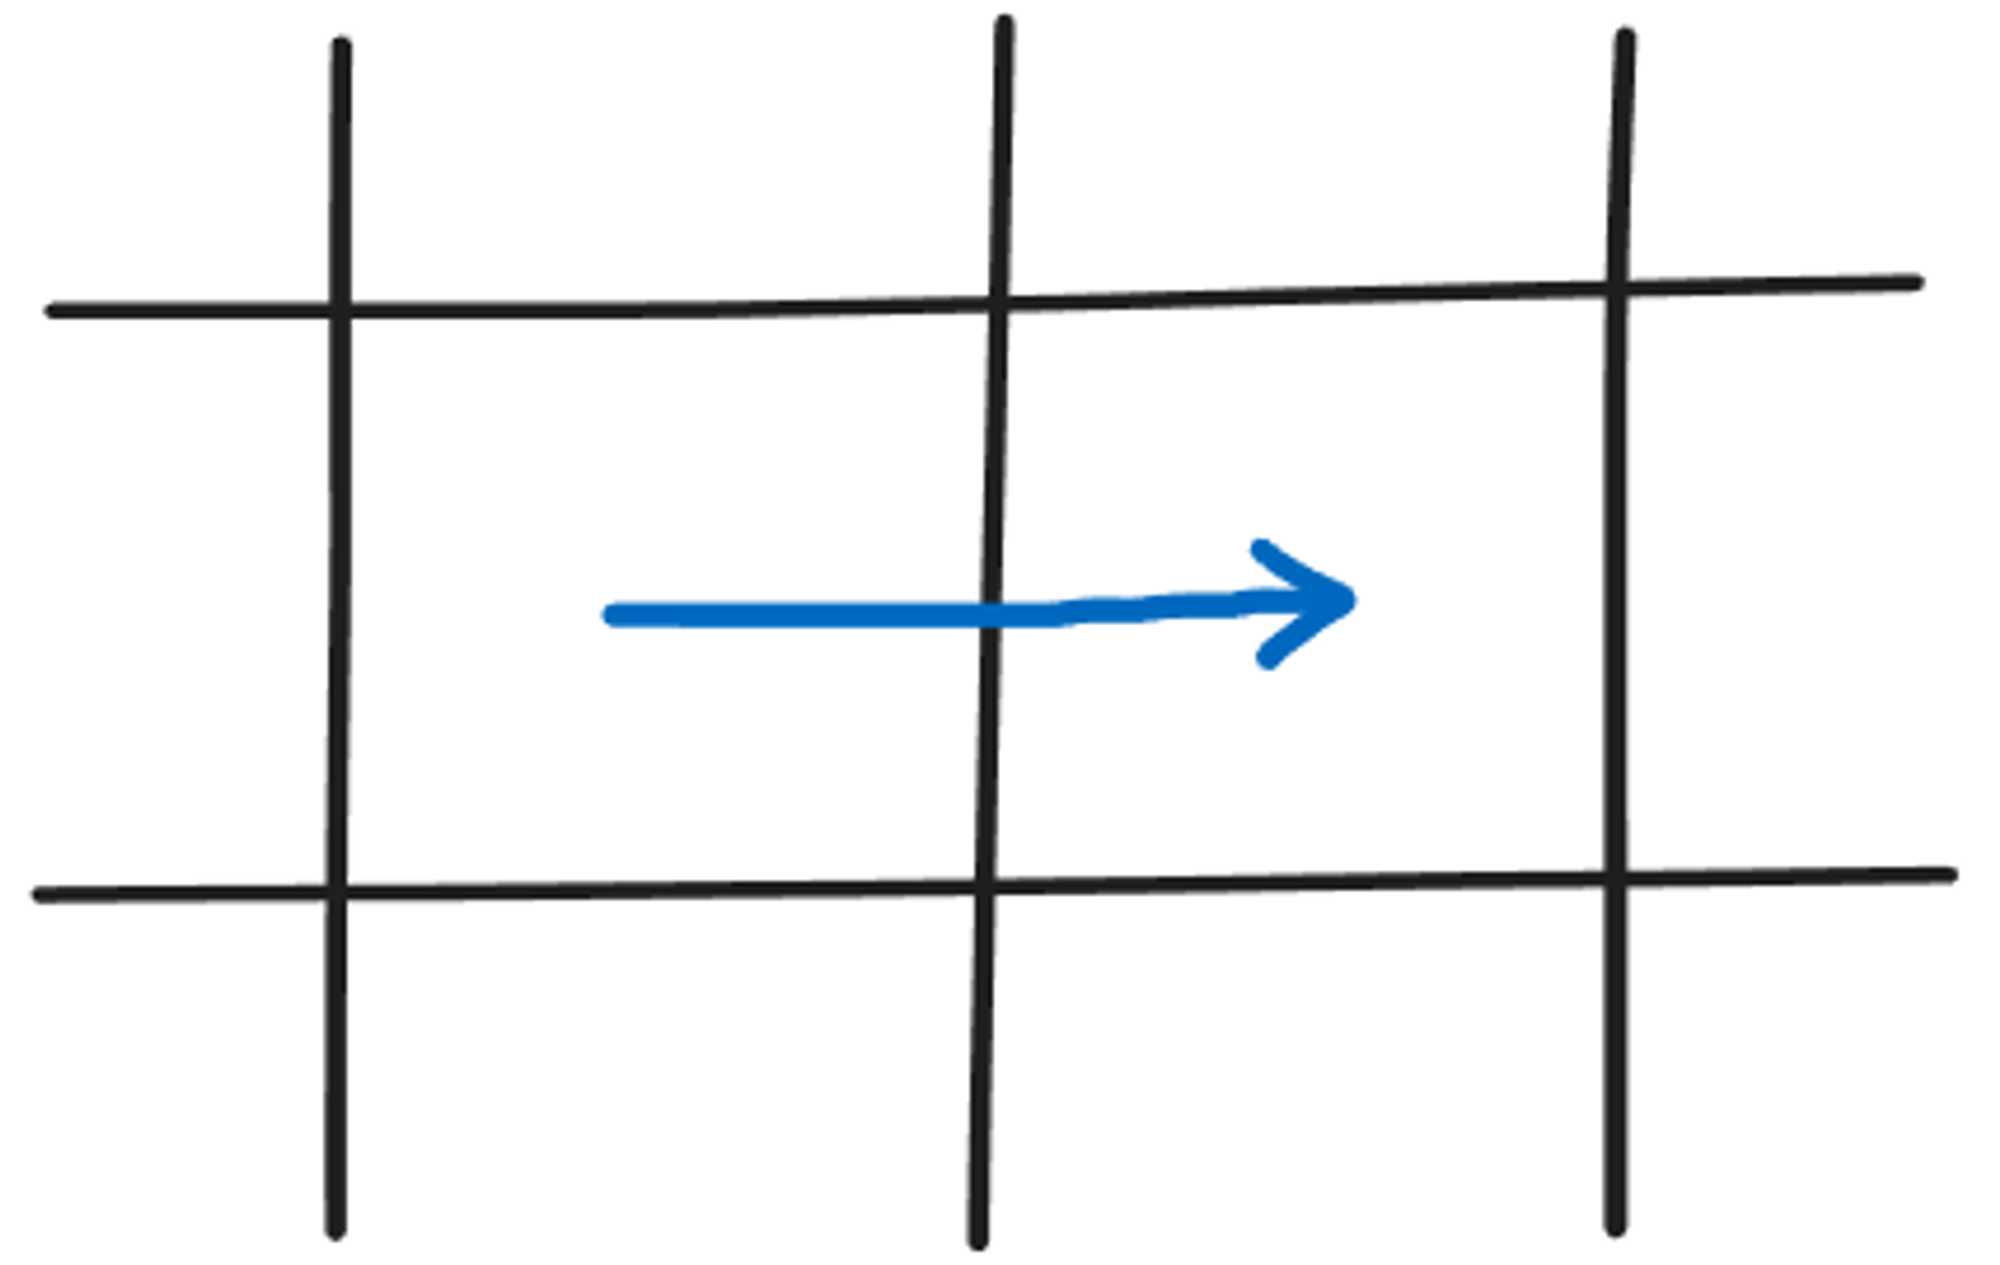
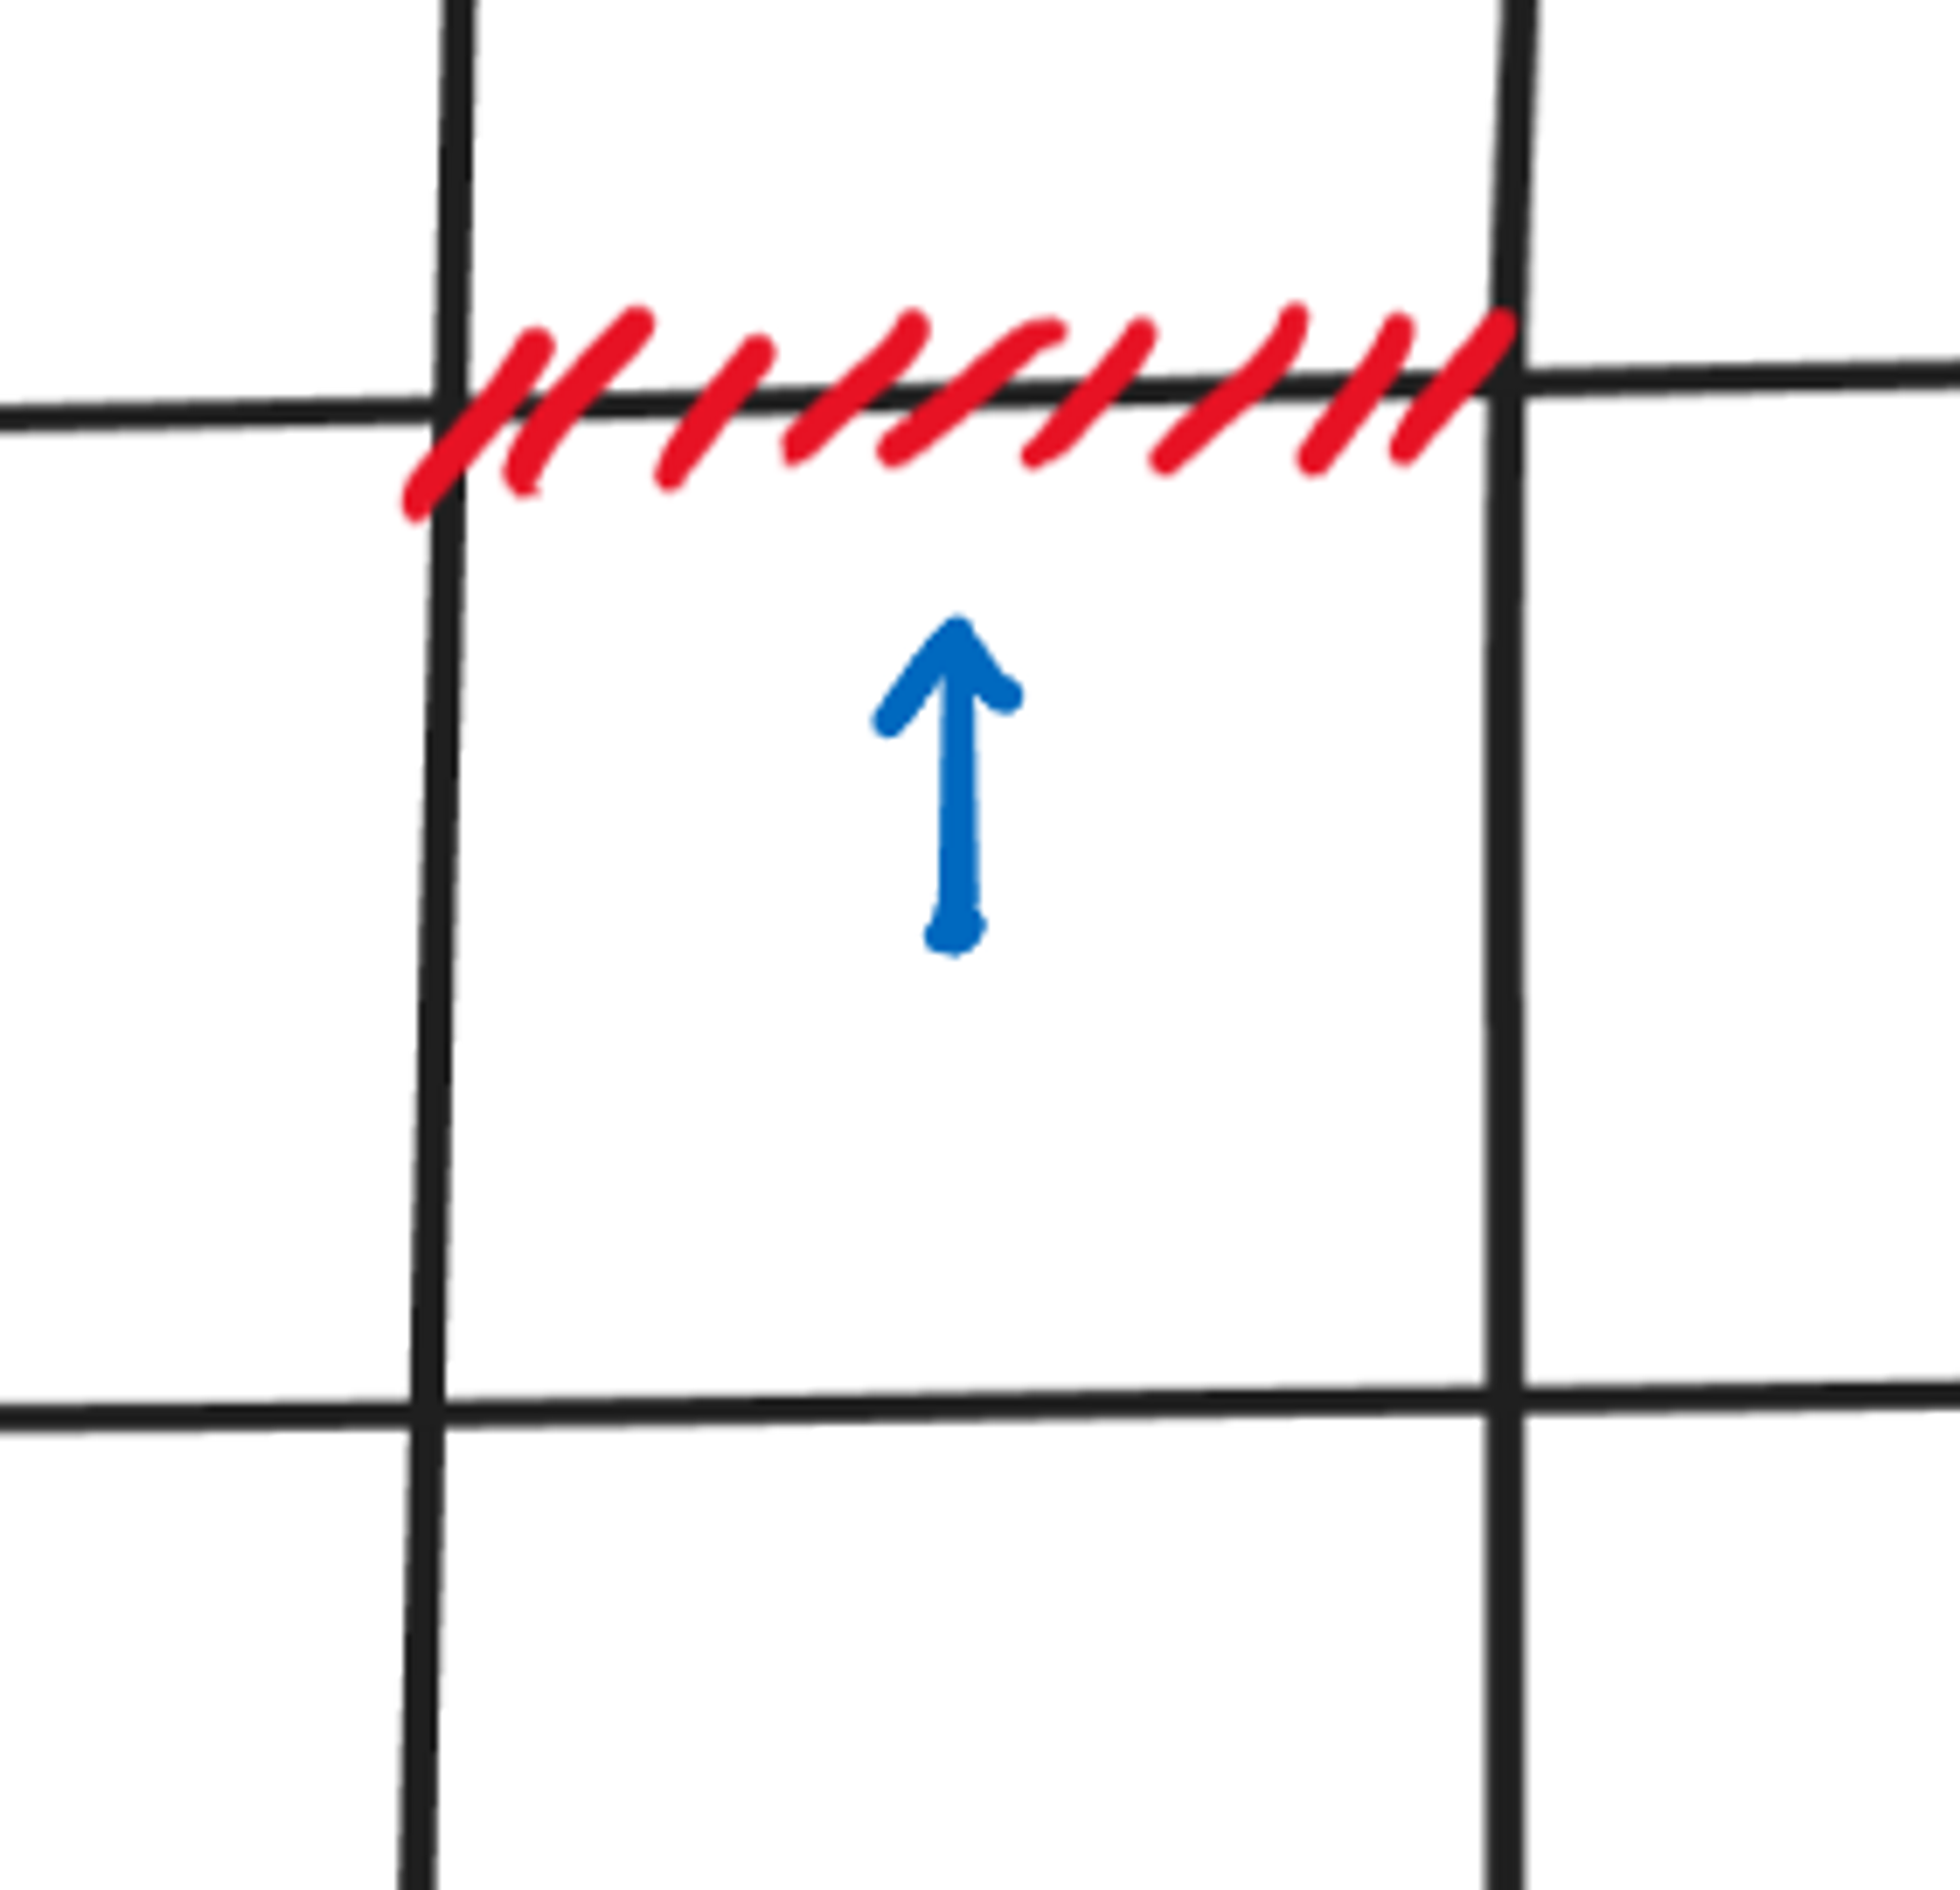
나머지 4면은 셀의 한 변의 길이가 2라고 할 때 다음과 같은 방식으로 구할 수 있습니다.

코드에서는 다음과 같습니다.
float3 GetSideVector( int sideIndex, float3x3 orientation )
{
    static const float smallComponent = 0.447214f; // 1 / sqrt(5)
    static const float bigComponent = 0.894427f; // 2 / sqrt(5)
    return mul( float3( smallComponent * Side[sideIndex], bigComponent ), orientation );
}
입체각의 경우에도 전파 방향의 면과 나머지 4면의 입체각의 경우로 나눌 수 있습니다. 자세한 유도 방법은 https://blog.blackhc.net/2010/07/light-propagation-volumes/ 의 샘플에서 설명하고 있으므로 여기서는 다루지 않겠습니다. 코드에서는 방향 벡터와 마찬가지로 미리 계산된 상수가 사용됩니다.
static const float DirectFaceSolidAngle = 0.4006696846f / PI; // 전파 방향의 면
static const float SideFaceSolidAngle = 0.4234413544f / PI; // 나머지 4면
또한 전파 중에도 장면에 의한 차폐를 고려해야 합니다. 여기서 기하 주입 단계의 GV 텍스쳐가 사용됩니다. 다음과 같이 선형 보간이 적용될 수 있도록 UV를 계산합니다.
float transmittance = 1.f;
if ( doOcclusion )
{
		/*
		전파 방향의 절반만큼 이동하여 선형 보간이 적용될 수 있도록
		*/
		float3 uvw = ( neighborIndex + 0.5f * sideVector ) / TexDimension.xyz;
		float4 coeffOcclusion = CoeffOcclusion.SampleLevel( BlackBorderLinearSampler, uvw, 0 );
		/*
		차폐 가능성이 1이면 투과율은 0이 된다.
		*/
		transmittance = 1.f - saturate( dot( ShFunctionL1( -sideVector ), coeffOcclusion ) );
}
끝으로 각 면에 전파된 빛을 셀 중심의 구형 조명으로 재투영하면 한 셀에 대한 전파가 완료됩니다. 이 과정은 셀 중심에서 해당 면 방향의 벡터에 대한 SH 계수의 투영입니다.
최종적으로 SH 투영 코드는 다음과 같습니다.
/*
transmittance - 투과율
SideFaceSolidAngle - 전파 방향에 대한 입체각
neighborCoeffR - 이웃의 SH 계수
sideSH - 전파 방향의 SH 계수
reprojectionCosineLobeSH - 재투영 SH 계수
*/
r += transmittance * SideFaceSolidAngle * dot( neighborCoeffR, sideSH ) * reprojectionCosineLobeSH;
이제 전체 코드를 살펴보겠습니다.
#include "Common/Constants.fxh"
#include "IndirectLighting/LPV/LPVCommon.fxh"

RWTexture3D<float4> CoeffR : register( u0 );
RWTexture3D<float4> CoeffG : register( u1 );
RWTexture3D<float4> CoeffB : register( u2 );

RWTexture3D<float4> OutCoeffR : register( u3 );
RWTexture3D<float4> OutCoeffG : register( u4 );
RWTexture3D<float4> OutCoeffB : register( u5 );

Texture3D<float4> CoeffOcclusion : register( t0 );
SamplerState BlackBorderLinearSampler : register( s0 );

cbuffer LightPropagationParameters : register( b0 )
{
    uint InterationCount;
};

static const float DirectFaceSolidAngle = 0.4006696846f / PI;
static const float SideFaceSolidAngle = 0.4234413544f / PI;

/*
인접면에 대한 방향 벡터
*/
static const float3 NeighborOffsets[6] = {
    float3( 0.f, 0.f, 1.f ),    // +Z
    float3( 0.f, 0.f, -1.f ),   // -Z
    float3( 1.f, 0.f, 0.f ),    // +X
    float3( -1.f, 0.f, 0.f ),   // -X
    float3( 0.f, 1.f, 0.f ),    // +Y
    float3( 0.f, -1.f, 0.f ),   // -Y
};

/*
인접면에 대한 회전 행렬
*/
static const float3x3 NeighborOrientations[6] = {
    float3x3( 1.f, 0.f, 0.f, 0.f, 1.f, 0.f, 0.f, 0.f, 1.f ), // +Z
    float3x3( -1.f, 0.f, 0.f, 0.f, 1.f, 0.f, 0.f, 0.f, -1.f ), // -Z
    float3x3( 0.f, 0.f, -1.f, 0.f, 1.f, 0.f, 1.f, 0.f, 0.f ), // +X
    float3x3( 0.f, 0.f, 1.f, 0.f, 1.f, 0.f, -1.f, 0.f, 0.f ), // -X
    float3x3( 1.f, 0.f, 0.f, 0.f, 0.f, -1.f, 0.f, 1.f, 0.f ), // +Y
    float3x3( 1.f, 0.f, 0.f, 0.f, 0.f, 1.f, 0.f, -1.f, 0.f ), // -Y
};

static const float2 Side[4] = {
    float2( 1.f, 0.f ),
    float2( 0.f, 1.f ),
    float2( -1.f, 0.f ),
    float2( 0.f, -1.f ),
};

/*
출발 셀에서 대상 면으로의 방향 벡터
*/
float3 GetSideVector( int sideIndex, float3x3 orientation )
{
    static const float smallComponent = 0.447214f; // 1 / sqrt(5)
    static const float bigComponent = 0.894427f; // 2 / sqrt(5)
    return mul( float3( smallComponent * Side[sideIndex], bigComponent ), orientation );
}

/*
셀 중심에서 면으로의 방향 벡터
*/
float3 GetReprojectionVector( int sideIndex, float3x3 orientation )
{
    return mul( float3( Side[sideIndex], 0.f ), orientation );
}

[numthreads(8, 8, 1)]
void main( uint3 DTid : SV_DispatchThreadId )
{
    if ( all( DTid >= 0 ) && all( DTid < TexDimension.xyz ) )
    {
        float4 r = (float4)0.f;
        float4 g = (float4)0.f;
        float4 b = (float4)0.f;

        /*
        셀프 쉐도잉을 방지하기 위해 처음 전파시에는 차폐 처리를 하지 않습니다.
        */
        bool doOcclusion = ( InterationCount > 1 );

        /*
        6개의 인접 면 방향의 셀에 대해 전파
        */
        for ( int neighbor = 0; neighbor < 6; ++neighbor )
        {
            int3 neighborIndex = (int3)DTid - NeighborOffsets[neighbor];

            if ( any( neighborIndex < 0 ) || any( neighborIndex >= TexDimension.xyz ) )
            {
                continue;
            }

            float4 neighborCoeffR = CoeffR.Load( neighborIndex );
            float4 neighborCoeffG = CoeffG.Load( neighborIndex );
            float4 neighborCoeffB = CoeffB.Load( neighborIndex );

            float3x3 orientation = NeighborOrientations[neighbor];

            /*
            측면 4방향
            */
            // side
            for ( int side = 0; side < 4; ++side )
            {
                float3 sideVector = GetSideVector( side, orientation );
                float3 reprojectionVector = GetReprojectionVector( side, orientation );

                float4 sideSH = ShFunctionL1( sideVector );
                float4 reprojectionCosineLobeSH = CosineLobe( reprojectionVector );

                /*
                차폐 계산
                */
                float transmittance = 1.f;
                if ( doOcclusion )
                {
                    float3 uvw = ( neighborIndex + 0.5f * sideVector ) / TexDimension.xyz;
                    float4 coeffOcclusion = CoeffOcclusion.SampleLevel( BlackBorderLinearSampler, uvw, 0 );
                    transmittance = 1.f - saturate( dot( ShFunctionL1( -sideVector ), coeffOcclusion ) );
                }

                r += transmittance * SideFaceSolidAngle * dot( neighborCoeffR, sideSH ) * reprojectionCosineLobeSH;
                g += transmittance * SideFaceSolidAngle * dot( neighborCoeffG, sideSH ) * reprojectionCosineLobeSH;
                b += transmittance * SideFaceSolidAngle * dot( neighborCoeffB, sideSH ) * reprojectionCosineLobeSH;
            }

            /*
            정면 방향
            */
            // direct
            float4 directSH = ShFunctionL1( NeighborOffsets[neighbor] );
            float4 reprojectionCosineLobeSH = CosineLobe( NeighborOffsets[neighbor] );

            /*
            차폐 계산
            */
            float transmittance = 1.f;
            if ( doOcclusion )
            {
                float3 uvw = ( neighborIndex + 0.5f * NeighborOffsets[neighbor] ) / TexDimension.xyz;
                float4 coeffOcclusion = CoeffOcclusion.SampleLevel( BlackBorderLinearSampler, uvw, 0 );
                transmittance = 1.f - saturate( dot( ShFunctionL1( -NeighborOffsets[neighbor] ), coeffOcclusion ) );
            }

            r += transmittance * DirectFaceSolidAngle * dot( neighborCoeffR, directSH ) * reprojectionCosineLobeSH;
            g += transmittance * DirectFaceSolidAngle * dot( neighborCoeffG, directSH ) * reprojectionCosineLobeSH;
            b += transmittance * DirectFaceSolidAngle * dot( neighborCoeffB, directSH ) * reprojectionCosineLobeSH;
        }

        OutCoeffR[DTid] = r;
        OutCoeffG[DTid] = g;
        OutCoeffB[DTid] = b;
    }
}
Rendering
렌더링 코드는 다음과 같습니다. G-Buffer를 이용하여 전체 화면에 대한 GI를 렌더링합니다.
#include "Common/Constants.fxh"
#include "Common/NormalCompression.fxh"
#include "Common/ViewConstant.fxh"
#include "IndirectLighting/LPV/LPVCommon.fxh"

Texture2D ViewSpaceDistance : register( t0 );
Texture2D WorldNormal : register( t1 );

Texture3D CoeffR : register( t2 );
Texture3D CoeffG : register( t3 );
Texture3D CoeffB : register( t4 );

SamplerState BlackBorderSampler : register( s0 );

struct PS_INPUT
{
    float4 position : SV_POSITION;
    float3 worldPosition : POSITION0;
    float3 viewRay : POSITION1;
    float3 worldRay : POSITION2;
    float2 uv : TEXCOORD0;
};

float4 main( PS_INPUT input ) : SV_TARGET
{
    float3 packedNormal = WorldNormal.Sample( BlackBorderSampler, input.uv ).yzw;
    float3 worldNormal = SignedOctDecode( packedNormal );

    /*
    L1 Band SH 계수
    빛은 worldNormal의 반대 방향에서 들어온다.
    */
    float4 sh = ShFunctionL1( -worldNormal );

    float viewSpaceDistance = ViewSpaceDistance.Sample( BlackBorderSampler, input.uv ).x;
    float3 viewPosition = normalize( input.viewRay ) * viewSpaceDistance;

    float4 worldPosition = mul( float4( viewPosition, 1 ), InvViewMatrix );
    worldPosition /= worldPosition.w;

    /*
    LPV 볼륨 텍스쳐 샘플링을 위한 UV 좌표
    */
    float3 lpvUV = GetLpvUV( worldPosition.xyz );

    float4 coeffR = CoeffR.Sample( BlackBorderSampler, lpvUV );
    float4 coeffG = CoeffG.Sample( BlackBorderSampler, lpvUV );
    float4 coeffB = CoeffB.Sample( BlackBorderSampler, lpvUV );

    float3 lighting = max( float3( dot( coeffR, sh ), dot( coeffG, sh ), dot( coeffB, sh ) ), 0.f );

    return float4( lighting / PI, 1.f );
}
렌더링에서 사용되는 주요 함수의 구현은 다음과 같습니다.
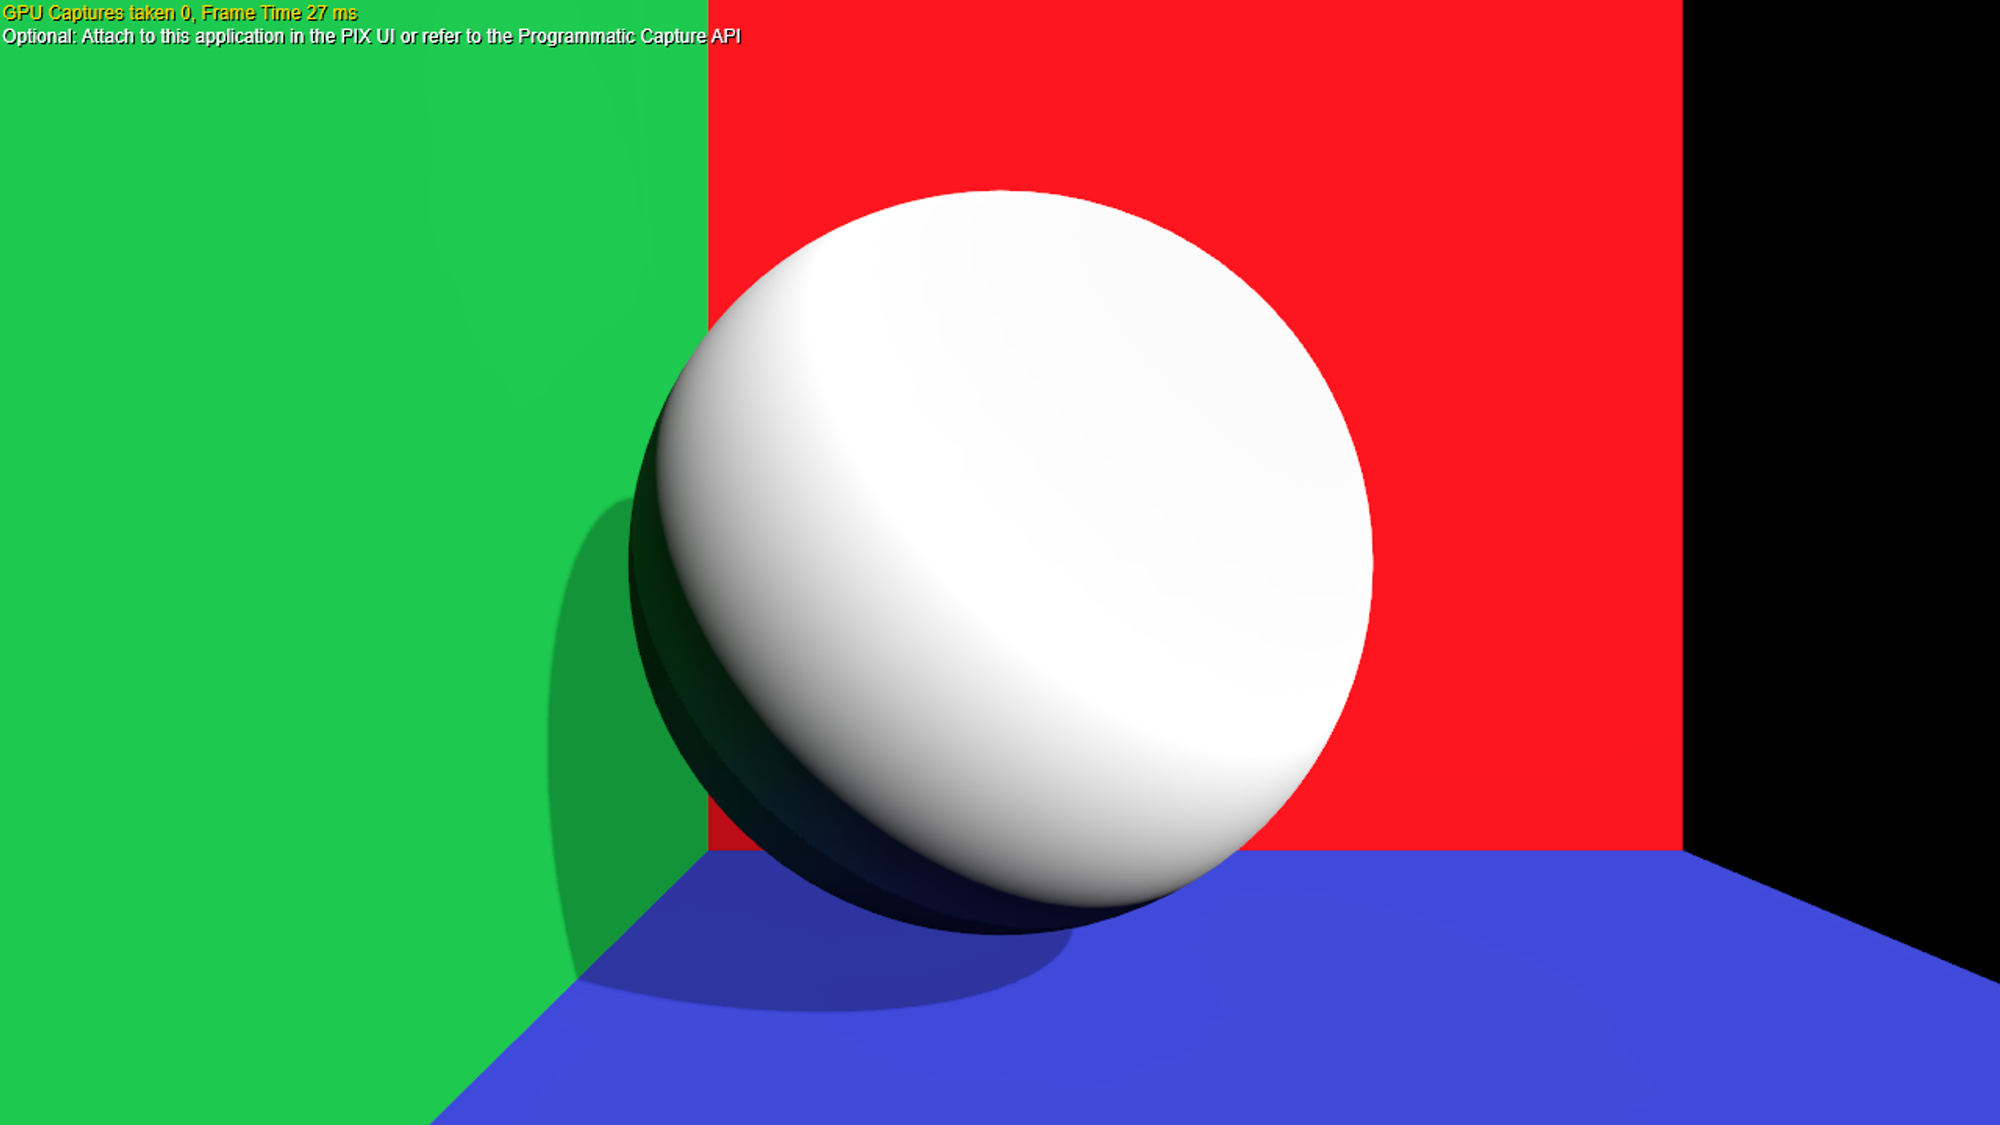
float4 ShFunctionL1( float3 v )
{
    return float4( 0.282095f, -0.488603f * v.y, 0.488603f * v.z, -0.488603f * v.x );
}

/*
텍스쳐 보간이 될 수 있는 UV를 반환
*/
float3 GetLpvUV( float3 position )
{
    float3 halfTexDimension = TexDimension.xyz * 0.5f;
    float3 gridPosition = ( position / CellSize.xyz ) + halfTexDimension;

    return gridPosition / TexDimension.xyz;
}
최종 렌더링 결과는 다음과 같습니다.


마치며
RSMs에 비해 LPV는 실시간 GI를 매우 빠른 속도로 근사할 수 있습니다. 동일한 장면에 대해 아래와 같이 큰 성능 차이를 보입니다.

( RSMs / LPV ) 
또한 다수의 조명을 용이하게 지원할 수 있는 등 LPV는 많은 장점을 가지고 있습니다.
다만 LPV를 구현하면서 느낀 것인데 번쩍이는 현상을 방지하기 위해 RSMs 텍스쳐를 주의 깊게 준비해야 할 필요성이 있다고 느꼈습니다. 이에 따라 RSMs를 위한 별도의 패스가 필요하게 된다면 그림자와 함께 RSMs를 렌더링함에 따른 이득이 사라지게 되어 비용이 상승할 수 있다고 생각됩니다.
준비한 내용은 여기까지입니다. 감사합니다.
Reference
- https://ericpolman.com/2016/06/28/light-propagation-volumes/
- https://advances.realtimerendering.com/s2009/Light_Propagation_Volumes.pdf
- https://unityshader.hatenablog.com/entry/2014/05/10/040142
- https://ia800902.us.archive.org/25/items/crytek_presentations/20100301_lpv.pdf
- https://blog.blackhc.net/2010/07/light-propagation-volumes/
'개인 프로젝트' 카테고리의 다른 글
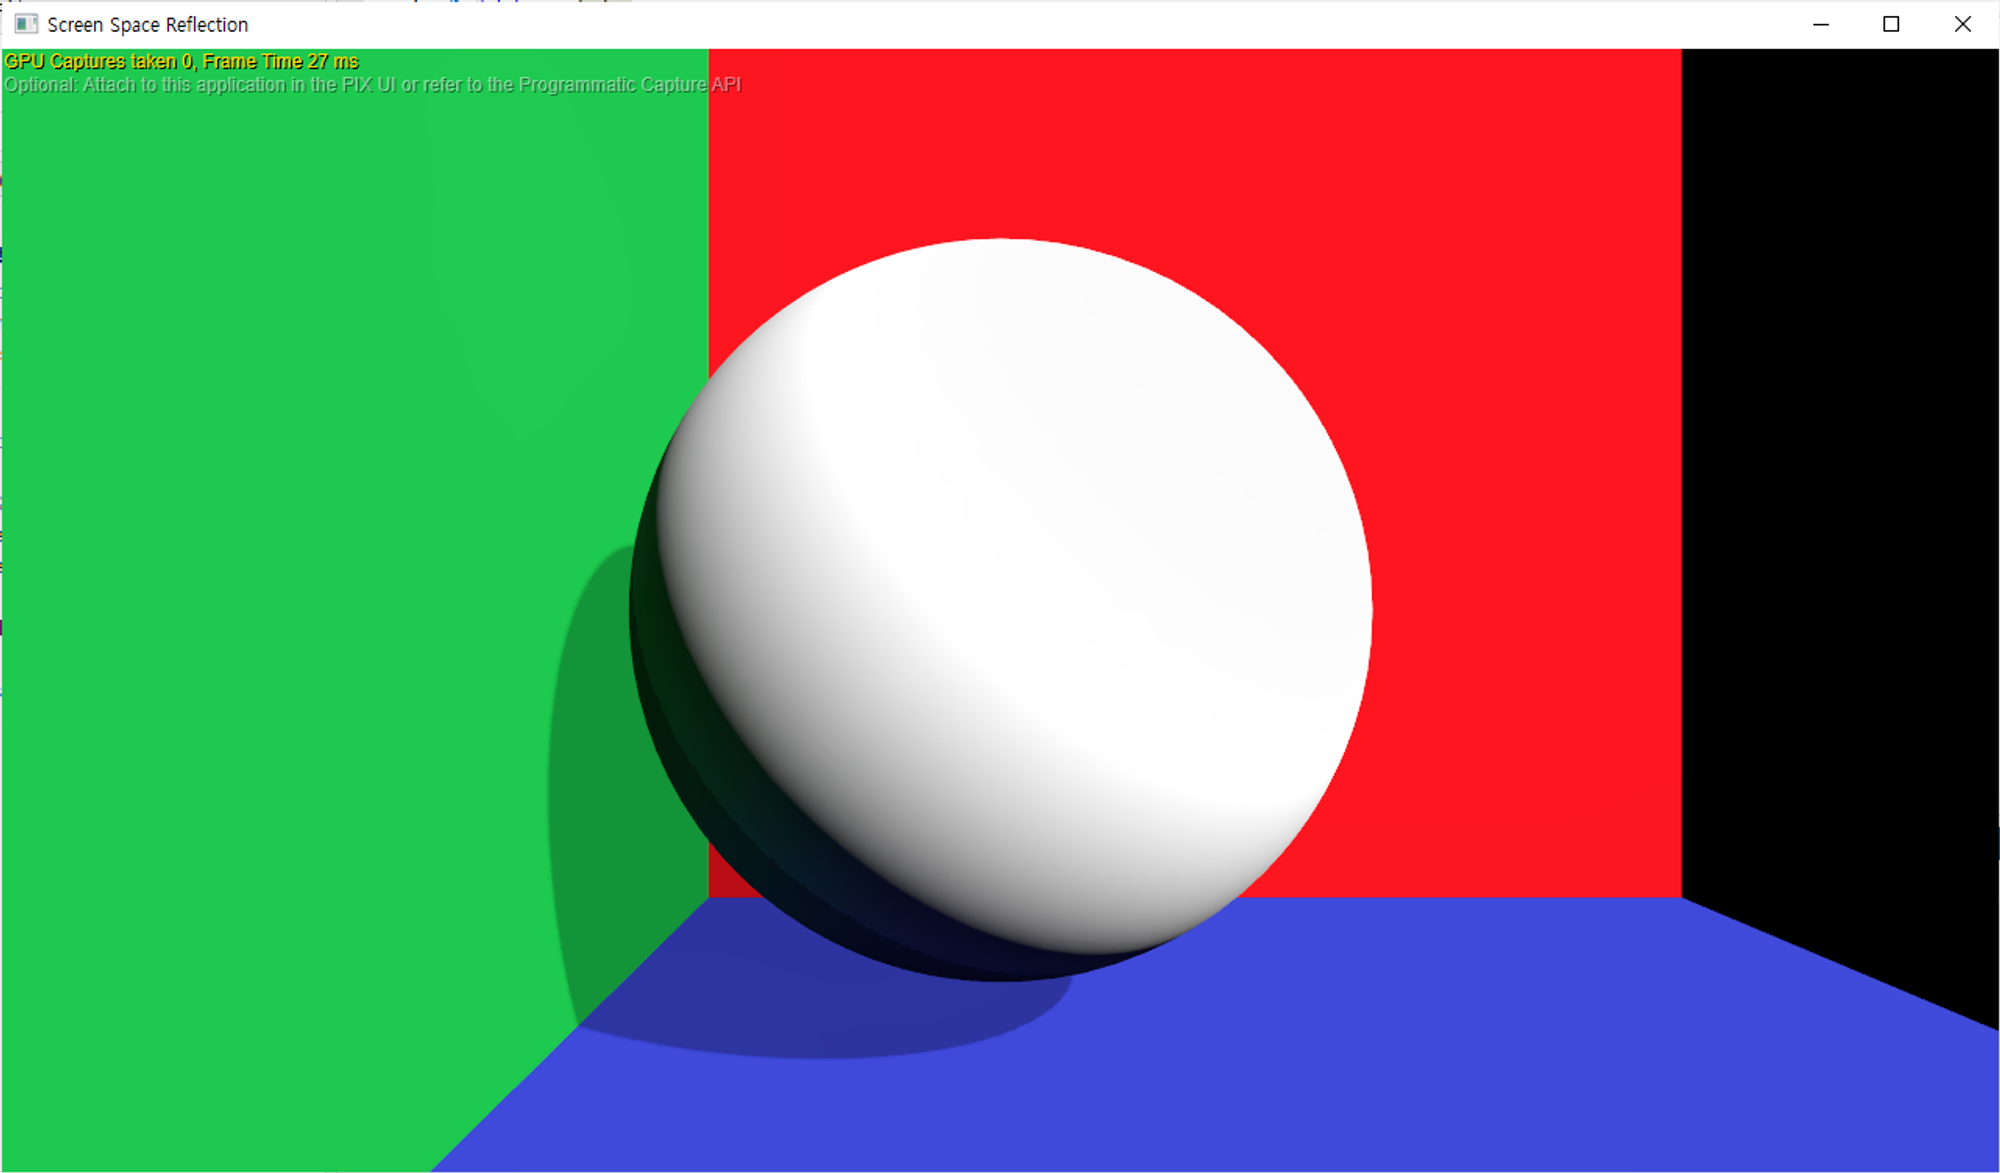
Specular IBL (0) 2024.05.24 Bindless Resource (0) 2024.03.20 화면 공간 반사 ( Screen Space Reflection ) (0) 2023.12.22 멀티 스레드 렌더링 (Multithreaded Rendering) (2) 2023.12.16 사전 계산 대기 산란 (Precomputed Atmospheric Scattering) (1) 2023.12.09